How To Login to MacOSX with your Phone's NFC

Updated March 15, 2026 00:17
Overview
There's times when you're forced to enter a long password so often that it's super inconvenient. In a recent poll of IT professionals, respondents cited "improved user convenience" as the top driver for system upgrades over "improved security posture" by an 11% margin. This tutorial walks through setting up a wallet pass and VTAP reader to securely login to a Mac with your phone's NFC chip. It'll involve running a background process that monitors the Lock screen and momentarily puts the VTAP in keyboard mode to summon the login prompt and inject the password when you scan your mobile wallet.
This tutorial assumes you've met the following pre-requisites:
- MacOSX computer or remote server
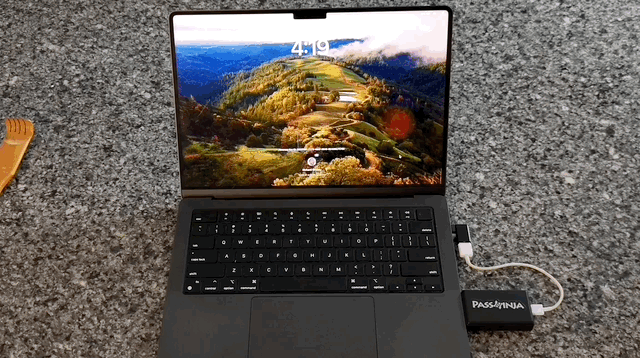
- Apple or Google Wallet pass with your Mac credentials issued by PassNinja
- VTAP series NFC reader properly configured for PassNinja passes
Manage Credentials Easy with PassNinja
Getting your phone's NFC to log you in to a Mac's lock screen requires you to first put your login credentials into your mobile wallet. Whether for Apple or Google Wallet, PassNinja is a great tool to help you do this. Go to the PassNinja dashboard and create a new pass template for your mobile wallet with Access Control set as the style. You can design out the look of the pass but what's most important is to set the NFC message field with your MacOSX password and send yourself a sample pass to install it. If you get stuck, you can check this other guide on scanning static content in passes for more details.
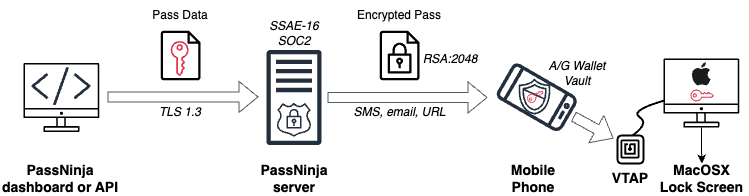
To keep things simple, we put the MacOSX password in clear text in the NFC message field and without any other data. This is secure because calls to our API are point-to-point encrypted (TLS 1.3), our server's compute environment meets latest security standards, and Apple and Google Wallets encrypt (RSA:2048) NFC data and store it in a protected area of your phone. The diagram below shows the data workflow and the several security protections in place. The red key exemplifies the NFC message data is as it's handled throughout the process.
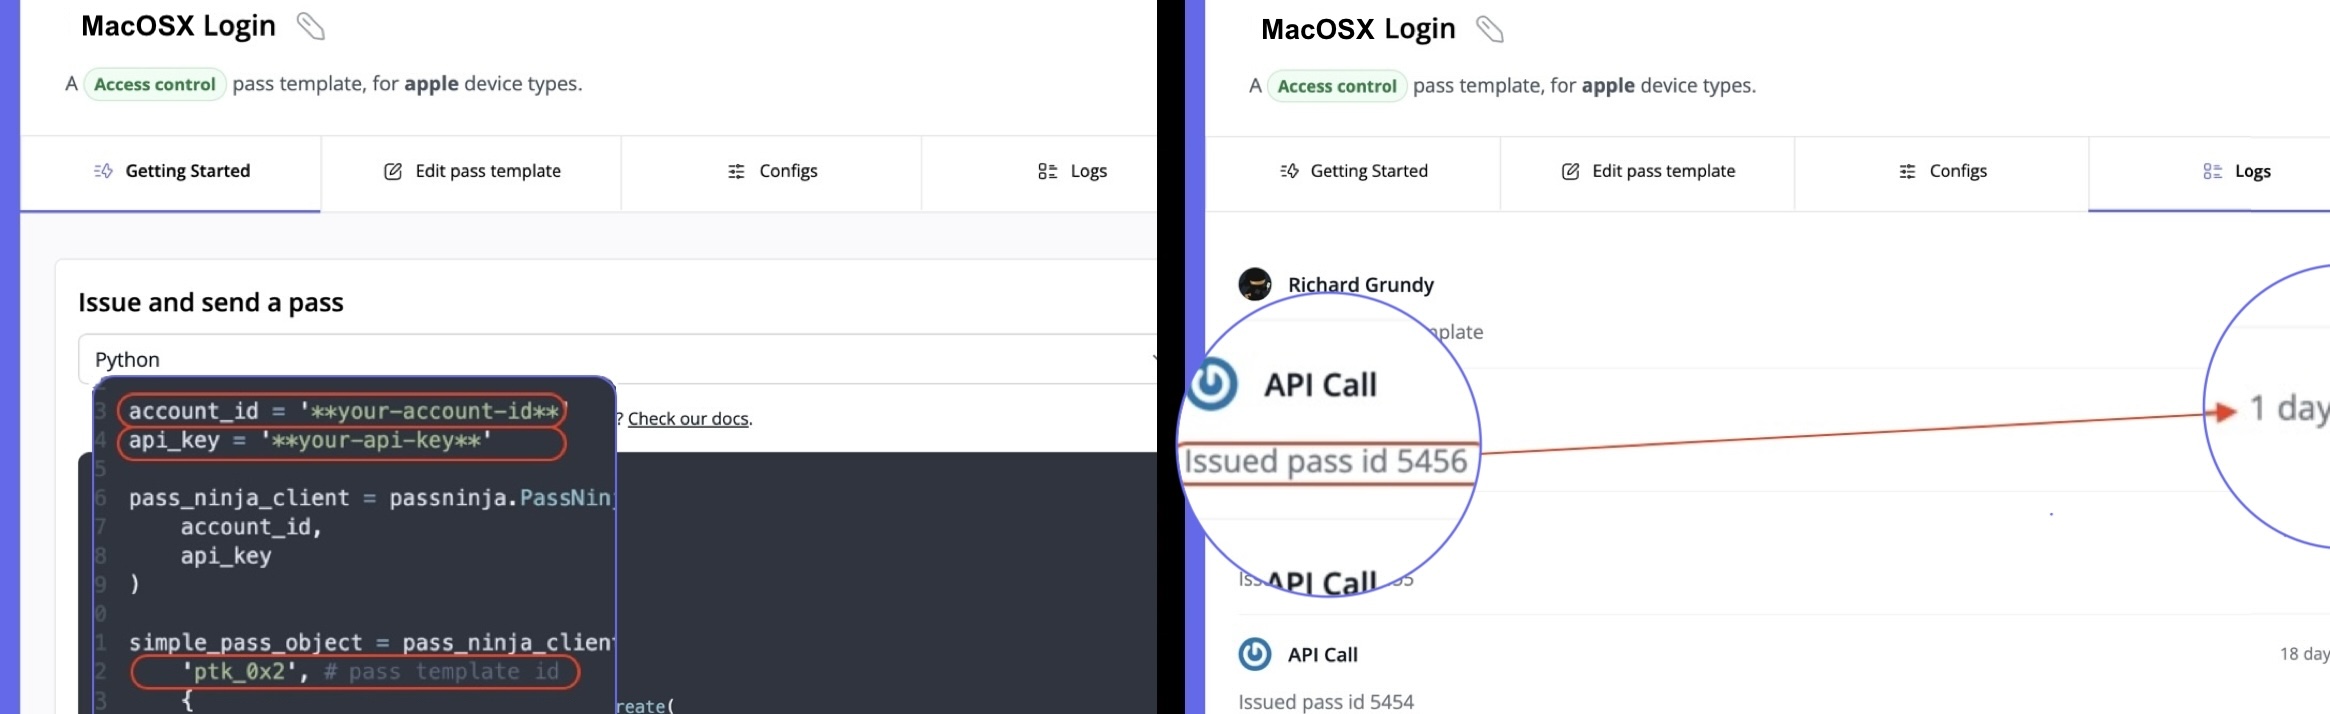
Once you've issued and installed a pass with your MacOSX credentials, you're all set to move to the next step. Yet if you need to update your wallet pass with a new password or something, it's only a few API commands to do so. You'll need a few things from the PassNinja dashboard to do so, including your account id, your API key, your pass template id, and your issued pass id. Here's a couple screen shots of where to find each of these (highlighted in red) on your PassNinja dahboard:
You can use these variables to setup a script to send pass updates in your favorite programming language. We have SDKs for Javascript, Python, Ruby, PHP, C#, Java and Swift and the updates happen seamlessly and without any need to reinstall the pass. Here's an example of the script I use in Python:
import passninja
passninja_client = passninja.PassNinjaClient('**your-account-id**', '**your-api-key**')
simple_pass_object = passninja_client.passes.put(
    'ptk_????',               # pass template id (listed on dashboard->Get Started)
    'pid_????',               # pass id (listed on dashbaord->Logs)
    {
        "member-name": "Richard Grundy",
        "nfc-message": "NewMacP@55w0rd",
    }                         # pass data
)                             # installed passes will update automatically
That's it! Now you can easily manage your MacOSX Login pass and keep it in sync with your MacOSX credentials. Next we'll look at building an app to control a VTAP series NFC reader and enter your credentials into your Mac's lock screen.
Coding a LoginBot app
There are a few things that need to happen to capture your credentials from your phone's NFC and get them to unlock MacOSX, starting with figuring out the right keystrokes to go through. The VTAP's keyboard mode can only emulate simple keystrokes (no key combos) represented by the ASCII character code chart (no function keys). So we'll need to study the MacOSX lock screen to see what keystrokes get us to the login prompt.
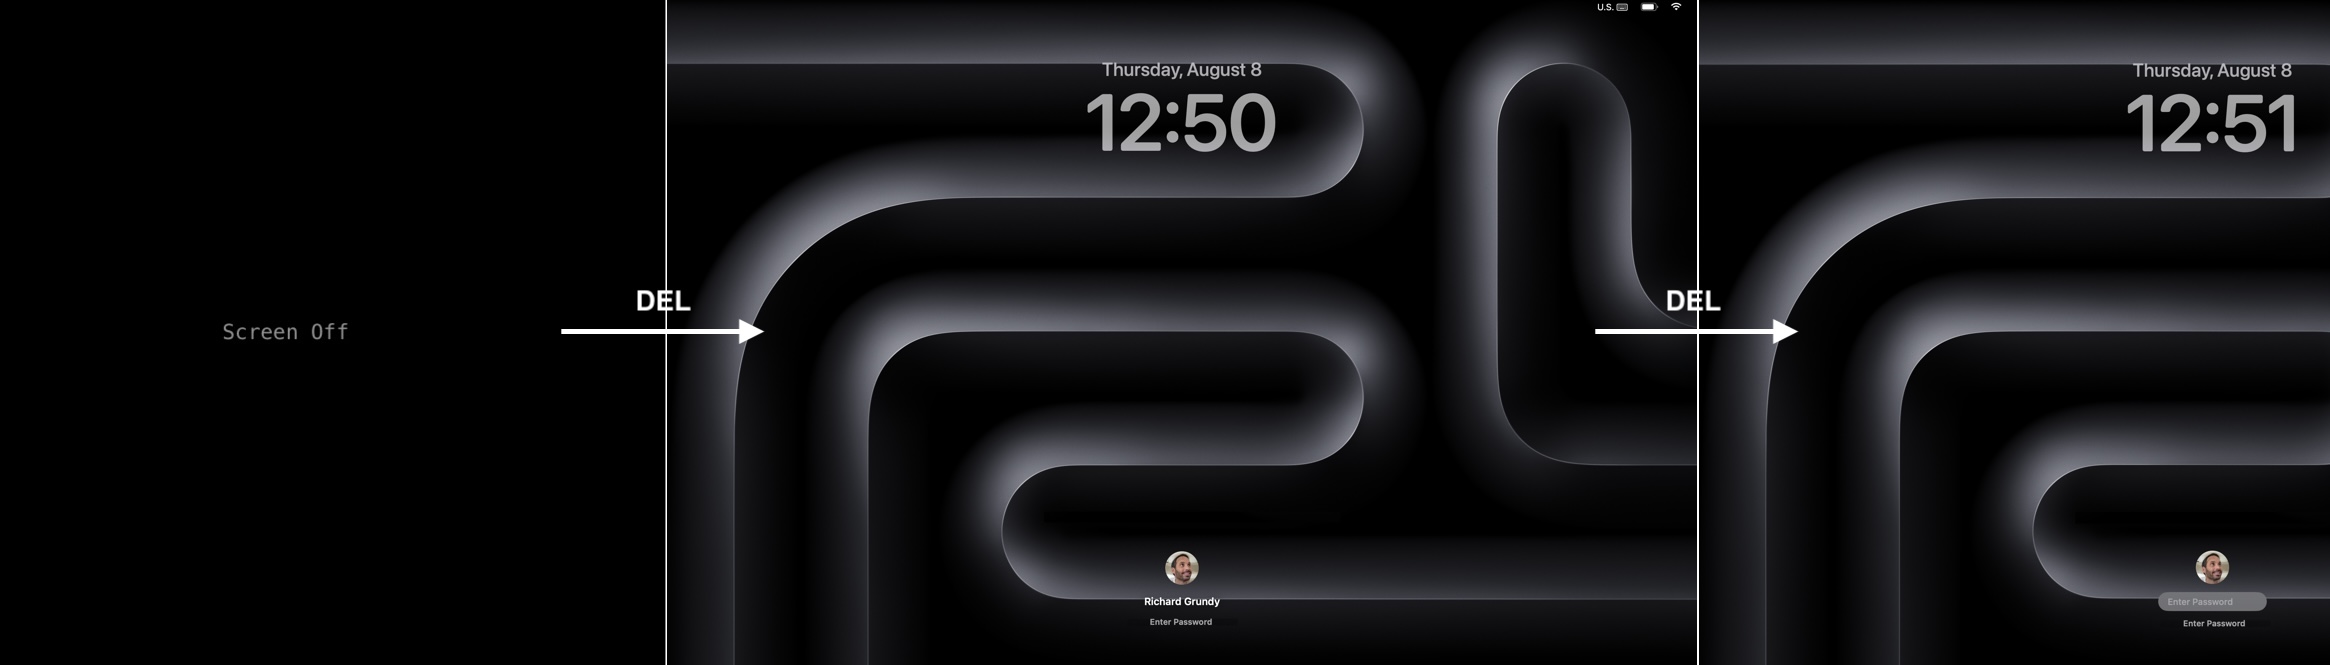
The MacOSX lock screen is managed by the CGSSessionScreenIsLocked session. When it's engaged, it appears to have 3 states: Screen off, Screen on with Time/Current User, and Screen on with password prompt selected. Hitting the Delete key (DEL) can cycle through these screens and always end at the password-prompt-selected state without generating any error conditions. To keep things simple, we'll assume the current user matches the wallet pass user but a similar approach can be used to login as a different user as well.
Since we don't want any keystrokes to be injected unless we're in the CGSSessionScreenIsLocked session, we'll need to monitor when the lock screen is launched and enable the VTAP's keyboard mode only during that time. We covered how to control the VTAP from a background app in another tutorial so we'll jump right into building our LoginBot app next. The gist of what LoginBot will do is:
- Open a COM port connection to the VTAP
- Initialize VTAP configurations with:
- Passive mode enabled to prevent log file from capturing passwords by mistake
- Keyboard Mode prefix set to DEL, DEL before injecting NFC message data
- Keyboard Mode delay set to 30ms to give LogonUI.exe time to respond to keystrokes
- Log responses to VTAP configurations
- Check for MacOSX lock screen session
- If lock screen is active,
- > enable VTAP Keyboard mode and log it Active
- Else lock screen is inactive,
- > disable VTAP Keyboard mode and log it Inactive
- Go to Step 4
Pretty straightforward, right? We'll use AppleScript to code this up into the script shown below. You can copy/paste it into a text file and update it with your COM port identifier and log file path. Then save it as LoginBot.scpt to run it from a command terminal like so:
osascript -e ./LoginBot.scpt#!/usr/bin/osascript
on run
-- initialize the VTAP with PassiveInterfaces=1, KBPrefix=%7F%7F, KBDelayMS=70
do shell script "PORT=$(ls /dev/cu.usbmodem*); echo \"\\$PassiveInterfaces=1\" > $PORT && read RESP < $PORT; echo $(date) : \"PassiveInterfaces=1\" $RESP >> /Users/rgrundy/Downloads/LoginLog.txt; echo \"\\$KBPrefix=%7F%7F\" > $PORT && read RESP < $PORT; echo $(date) : \"KBPrefix=%7F%7F\" $RESP >> /Users/rgrundy/Downloads/LoginLog.txt; echo \"\\$KBDelayMS=70\" > $PORT && read RESP < $PORT; echo $(date) : \"KBDelayMS=70\" $RESP >> /Users/rgrundy/Downloads/LoginLog.txt;"
end run
on idle
-- check if Lock screen, then enable KBLogMode, else disable KBLogMode.
-- log results to a text file for reference.
do shell script "if [ $(ioreg -n Root -d1 -a|grep -c CGSSessionScreenIsLocked) -gt 0 ]; then PORT=$(ls /dev/cu.usbmodem*); echo \"\\$KBLogMode=1\" > $PORT && read RESP < $PORT; echo $(date) : Active $RESP >> /Users/rgrundy/Downloads/LoginLog.txt; else PORT=$(ls /dev/cu.usbmodem*); echo \"\\$KBLogMode=0\" > $PORT && read RESP < $PORT; echo $(date) : Inactive $RESP >> /Users/rgrundy/Downloads/LoginLog.txt; fi;"
return 2 -- wait 2 seconds before next idle loop
end idleOnce you get it running, you can make it into a standalone application with this command:
This will let you double-click it to run it in the boackground or set it up to run automatically at startup in Windows.
Putting it all Together
Now that we have all the pieces, let's put it all together! Follow these steps to test out the experience:
- Mac logged in with Current User matching MacOSX Login pass and VTAP connected over USB
- Launch LoginBot and check that LoginLog.txt is being populated with Inactive OK
- Press CTRL-CMD-Q and to lock the screen
- Double-tap iPhone power button to launch Apple Wallet and authenticate with FaceID/TouchID/Passkey.
- Present iPhone top end to VTAP scan surface and what the magic happen!
- Once logged in, open any text editor and scan your pass again on the VTAP... you'll see nothing!
As passwords change (and get longer) you're just a simple API call away from updating your MacOSX Login pass. You can also modify LoginBot to monitor different applications that require different credentials and reconfigure the VTAP to scan for the right username/password when it's relevant app is in context. It's more convenient and secure than most password manager services.💡
Conclusion
PassNinja, LoginBot and a VTAP are a great solution for secure logon to systems where keyboard entry is the only option. The added convenience of an NFC tap and improved security of proof-of-presence biometrics (FaceID, TouchID, etc) makes for an efficient method of unlocking your workstation. Or any app for that mater. The programmability of a complete credential management system is made easy with the PassNinja API and helper libraries.
If you have any feedback on this article, let us know!
More articles focused on Nfc Software Sdks
If you have NFC tags in your possession, you may want to read the data on the tag. One of the eas...
How To Read Nfc Data From Vtap Via IpadIn this guide, we'll show you how to create an iPad app that is capable of reading NFC data from ...
How To Read Apple Vas Passes Using An Acs Wallet MateIf you have an ACS WalletMate, you may be wondering how to use it to read Apple passes. In this a...
How To Login To Windows With Your Phones NfcThere's times when you're forced to enter a long password so often that it's super inconvenient. ...