How to configure a Dot Origin VTAP100 NFC reader

Updated May 13, 2024 08:20
Overview
This guide will cover the process of setting up a VAS reader to detect and verify Apple and Google passes over NFC. VAS readers are made by only a few manufacturers and mostly sold through third party integrators. This can make it challenging for developers to get familiar with mobile wallet NFC technologies. We focus on the VTAP100 from Dot Origin and sold directly here. It's powered over USB and supports keyboard emulation so it's easy to build systems using it.
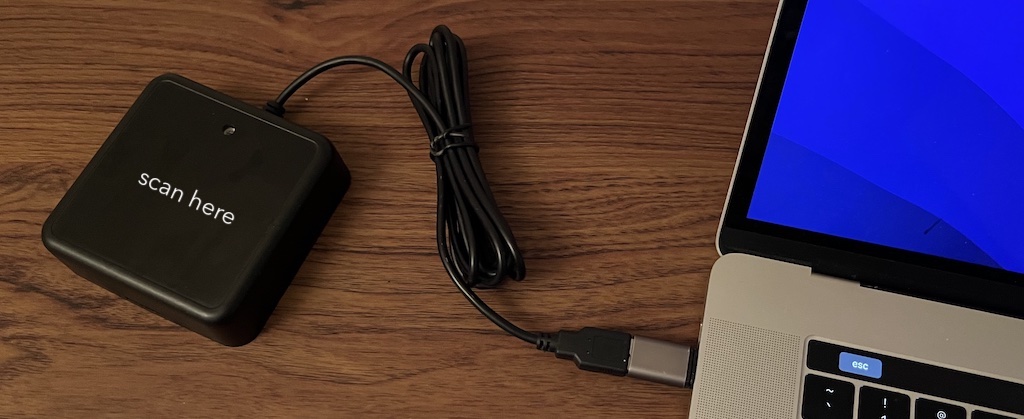
The VAS reader interacts with Apple and Google Wallets over the NFC interface by following the VAS protocol. Once configured and connected to a PC (or tablet), simply tap your smartphone against the scan surface. Your mobile NFC pass will be auto-selected and it's data sent to the connected PC.
Of course, the data can only be read if your phone contains a mobile NFC pass that has been issued in connection with the Apple Pass Type ID(s) or Google Collector ID(s) configured in the VAS reader. The VAS reader appears as a generic mass storage device (like a memory stick) when connected to a computer. To configure it, you simply edit or add text files. These will be read automatically, and control the operation of the reader. You also have the option of locking the VAS reader so that it's configuration can't be easily changed (more on that later).
Get Apple Pass Reading Parameters
You will need the reading parameters for your Apple Wallet passes in order to configure the VAS reader to scan them. We covered generating these parameters in this Apple guide and includes two pieces of data: the Pass Type ID used to sign pass bundles and the private.pem key that encrypts the data sent over NFC. Pass type IDs can be added to the VAS readers' config.txt file and look like this:
pass.com.myorg.myapp.mycampaignThe private key will need to be in a text file format and can be copied to the VAS reader as such. Generating the keys for NFC passes to work can be tricky, so follow this guide to create encryption keys for Apple Wallet. The gist is that the public key goes into the Apple passes and the private key goes into the VAS reader.
Get Google Pass Reading Parameters
You will need the reading parameters for your Google Wallet passes so that your VAS reader can scan them. We covered generating these parameters in this Google guide and includes three pieces of data: the Collector ID corresponding to your issuer account, the private.pem key that authenticates the NFC transaction, and the key version. The Collector ID is an 8 digit number that pairs with the 17 digit Issuer ID used when minting Google passes.
Similar to Apple, the Google keys need to be set properly for NFC passes to scan. The public key gets uploaded to the Google Wallet dashboard and the private key goes into the VAS reader. Google has an extra parameter, called the key version, that must match on the dashboard as well as the VAS reader.
Install Parameters on VAS Reader
If you navigate to the VTAP100 drive on your computer's file system, it will appear as an attached mass storage device and list the files contained, including the main config.txt file. To read mobile NFC passes, you will need to provide your pass reading parameters in the config.txt file. This means a Pass Type ID or Collector ID and any associated keys. These allow you to scan and decrypt pass data that is held by your users, on their smartphones.
Step 1: Upload key file(s) to your VAS Reader
- - Ensure each of the keys you need to use are stored in a file with the name
private#.pem, following the .pem format, where#is replaced with a number from 1 to 6, matching the key slot you will save it in. - - Load your keys by copying these files onto your reader, which shows up in the file system of your computer as a mass storage device.
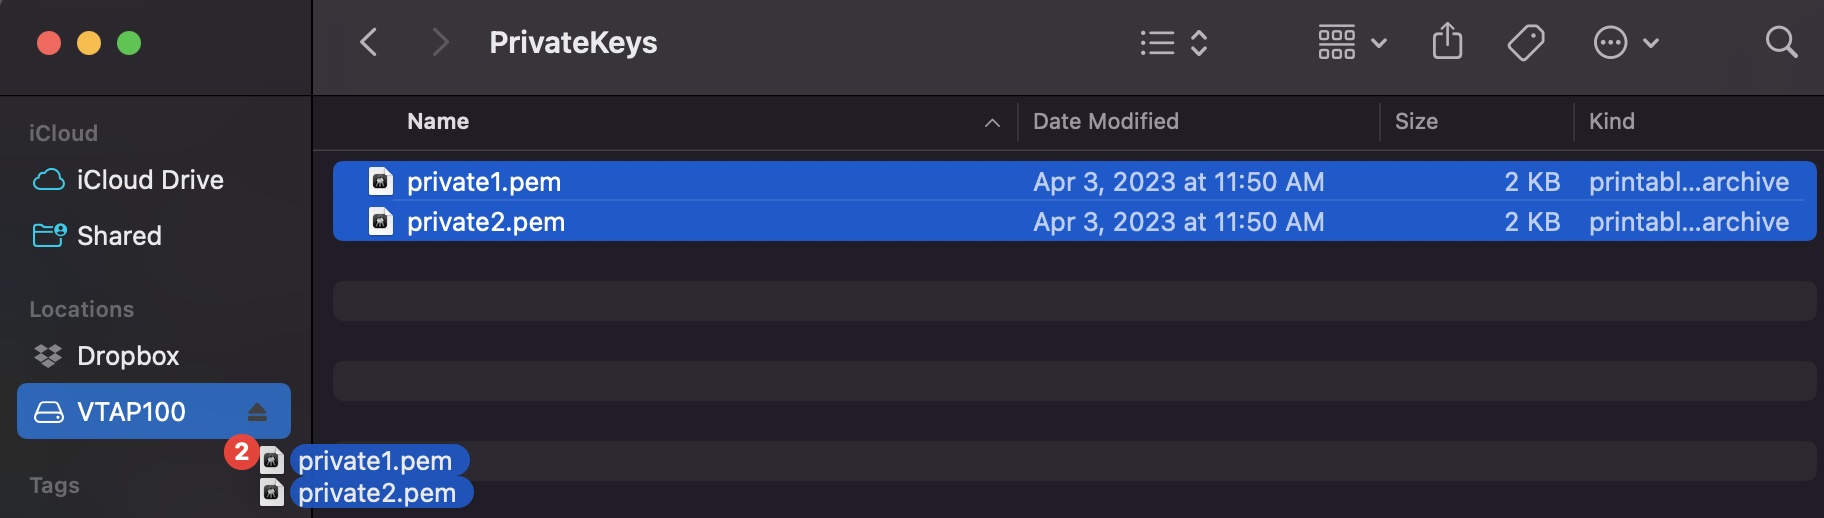
Note: The reader can only store up to 6 key files.
Note: When you reboot the reader your key will have been stored in hardware, and will no longer be listed as a file on the device. You can confirm key file(s) have been loaded when you check status in BOOT.TXT. If the key file does not disappear and there is an error in BOOT.TXT, check your .pem file as it's likely not following the specification (review Apple or Google guides for more details).
Step 2: Declare Pass Type ID(s)/Collector ID(s) in the config.txt file
- - Open the file
config.txtin a text editor (such asvior VSCode). It already contains parameters for accessing the demo PassNinja passes, prefixed VAS1 and ST1, each set on KeySlot 6. You can overwrite these, or keep them in addition to your own pass reading parameters. - - Add your pass reading parameters in the
config.txtfile to access up to six (6) Apple Pass Type IDs and/or Google Collector IDs, and identify the keys to be used in each case.
Note: Put each parameter on a new line. Order of parameters does not matter to the reader, but could help other people who need to edit the file. Start any comment lines in the config.txt file, that the reader should ignore, with a semicolon. Each parameter should only appear once - if it accidentally appears more than once then only the last instance will take effect.
Note: Although the VAS reader supports multiple IDs, Apple and Google expect most users will only use one. Using multiple IDs is an advanced feature to use with care. The VAS# and ST# numbers define the order in which IDs will be requested from Apple or Android phones respectively. The lowest numbered ID will be requested first, then continuing in ascending numeric order.
!VTAPconfig
VAS1MerchantID=[your Apple passtype ID]
VAS1KeySlot=1
; This says use the key added as file 'private1.pem' to read and
; decrypt any pass connected to your passtype ID on an Apple iPhone
ST1CollectorID=[your Google collector ID]
ST1KeySlot=2
ST1KeyVersion=1
; This says use the key added as file 'private2.pem' at key version 1
; to read any pass connected to your collector ID on an Android phone
Step 3. Save and Lock the Reader
- - Save the
config.txtfile. Changes will take effect immediately and persist across plug/unplugs of the VAS reader. - - To lock the reader so that bad actors can't change it's configurations, create and upload a
lock.txtfile with the following:
!VTAPlock
lock=[your_pa55word]
- - To unlock the reader, create and upload another
lock.txtfile with the following. If the password matches what was previously used to lock the reader, it will unlock. Make sure to check theBOOT.TXTfile to confirm lock/unlock commands are being processed properly.
!VTAPlock
unlock=[your_pa55word]
Note: It may appear that you can edit config.txt and other files, despite a software lock in place, but these edits will be silently ignored by the VTAP reader.
Note:The VTAP100 supports several other configurations that are outside of the scope of this guide. You can find out more by reviewing the VTAP100 Command Reference.
Making it simple with PassNinja
If you're using PassNinja and you buy a devkit, they come preconfigured with the keys for your pass templates! Skip the pain of generating private/public key pairs, creating pass type identifiers, collector ids, issuer ids and juggling them all to plug them into a config file.
Creating identifiers and their associated encryption keys can be a pain when you're trying to turn around new pass campaigns quickly. PassNinja automates this for you so you can streamline your workflow while staying protected against malicious attacks. Sign up now so you can get up and running ASAP.
Conclusion
This guide taught you about the VTAP100 from DotOrigin, and covered how to connect and configure it with your Google and Apple pass parameters and more. It's one of the most important steps in getting your NFC passes read by hardware devices. Next steps after this include narrowing your use case so you can identify the right production setup to get your NFC experience live in the wild.
More articles focused on Hardware
This guide covers how to control electrical equipment like an appliance or battery-powered device with a Raspberry Pi. The Raspberry Pi operates at transistor-transistor logic (TTL) voltage levels ...
How To Read Apple Vas Passes Using An Acs Wallet MateIf you have an ACS WalletMate, you may be wondering how to use it to read Apple passes. In this article, we'll be going over the steps to do just that:
How To Read Nfc Data From Vtap Via IpadIn this guide, we'll show you how to create an iPad app that is capable of reading NFC data from Apple passes using a VTAP 100, SwiftUI, and some glue code. By the end of it, you'll have an app tha...
How To Configure A Socket Mobile S550 Bluetooth Nfc ReaderThis guide will cover the process of setting up a VAS compatible bluetooth enabled NFC reader to detect and verify Apple passes over NFC. VAS readers are made by only a few manufacturers and mostly...
How To Build An Nfc Car KeyThis guide will show you how to replace your car keys with an NFC-enabled pass in your Apple or Google Wallet. Not only will this free you from having to carry car keys but it allows you to grant (...